Friday, October 31, 2008

My picture heavy How-To for Roasting Garlic

I intended on putting my recipe for my very favorite, sinfully delicious, ridiculously awesome Roasted Garlic Mashed Potatoes here. Then, however, I realized that I would first have to explain to most people how to roast garlic!

So that's what I'm going to do today. Another day, I'll give the mashed potato recipe. I always post recipes with step-by-step pictures, so.. if that's annoying let me know and I won't do it next time. This time, just deal with it. ;-)


HOW TO ROAST GARLIC
(which, p.s., can be put in/on pretty much anything. or eaten plain. it's friggin' delicious. I'd buy roasted garlic candy, I really would)

1. First step is to get a few bulbs of garlic. I usually do about five, since I can find a million things to do with roasted garlic. Make sure you get big, sturdy bulbs. What we don't want is a head that will break into a million teeny, tiny pieces instead of a few big, beautiful cloves.

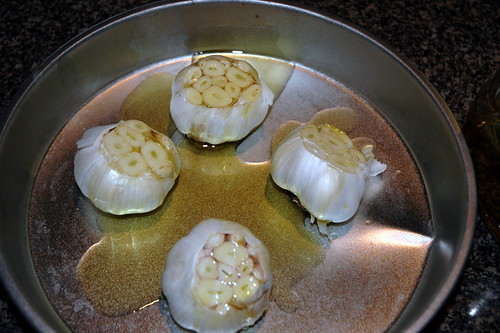
Cut off the top of the bulb, so that the little garlic clove's heads are exposed.

Roasting Garlic


2. Put the bulbs in a pie tin or a cake pan, open side up. While you do this, pretend that my pictures are taken in nice light and with better post-processing. It will make me feel better.

Roasting Garlic
They look freakishly like little pod animals. I can't look at it too long or it weirds me out. And kind of makes me feel sick, despite how much I love garlic. Eesh. Okay. Next step.

3. Drizzle Extra Virgin Olive Oil liberally over the top, ensuring that you cover all exposed cloves. Like drowning all the little pod bodies so they won't take over the earth.

Roasting Garlic

4. Salt and pepper the cloves. I like to live by the rule that you can never have too much salt. I know what you're thinking: It is OBVIOUS that I am the prime example for healthy living. =/ With that in mind, use your own judgment. But remember: Salt Tastes Good.

Roasting Garlic

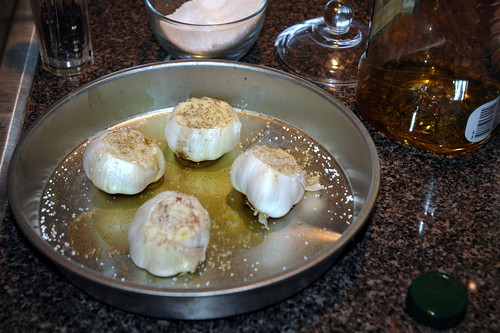
Note that I'm using Kosher Salt, here. It's not necessary, but I find it much better for most cooking purposes. It's called Kosher salt because it is used in making meats Kosher. Because of its flat surface, it sticks more easily and brings the blood out. It should also be noted that you typically need nearly twice as much kosher salt to equal the same amount of saltiness that you'd get from table salt.


5. Cover the pan with tinfoil, and place it in a 375 degree oven for about 35-45 minutes.

Roasting Garlic
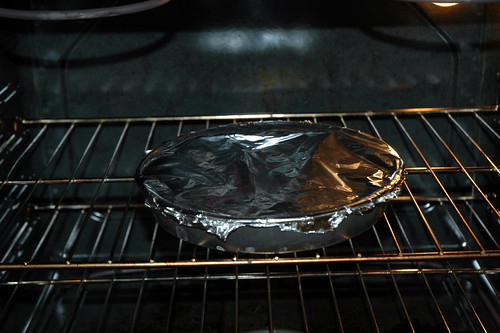
Pretend like you don't see the grease on the back of my oven. I really loathe cleaning ovens.


6. When the time is up, pull them out. They will look beautiful and ravishing. Like this.

Roasting Garlic


7. Important: WAIT UNTIL THEY COOL DOWN. You'd think this would be common sense, but I don't want any lawsuits on my hands, here. Give them 20 minutes. Then proceed.

Squeeze the cloves out of the bulbs. They will just POP out. Kind of like birthing a baby. A little garlic baby. Only without the blinding pain, and hours of pushing. And also, no uterus.

Roasting Garlic

Roasting Garlic


8. Et Voila! You now have a beautiful plate full of soft, incredibly flavorful garlic cloves that you can do pretty much anything with.

Roasting Garlic

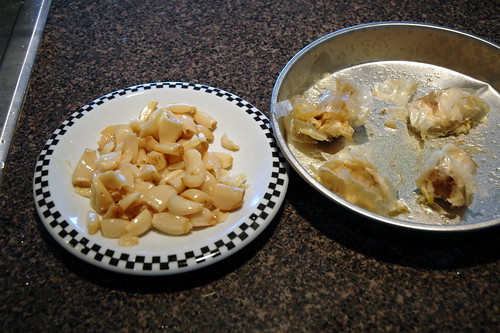
You can throw the garlic peely stuff (does it have a name??) away. Unless you are attached to it, and want to bury it in your backyard under a tree like some people do with their placentas.

I think I just took the birthing analogy a little too far. Moving on.


Roasting Garlic

Put them on baked potatoes. Put them in salads, pastas, meatloafs. Stick them in marinades, stuff them into chicken breasts. Keep them in a bag in your purse and munch on them all day long. Not only are they delicious, but they will also raise your immunity. Also ward off vampires.

Just be sure to carry some breathmints. Not everyone shares my adoration for the smell of garlic.

Thursday, October 30, 2008

Dad's Homemade Waffles

These waffles are my dad's famous breakfast recipe. They're light and fluffy and delicious!
This one's for you, Tori!!! :)

3 Eggs separated
1 3/4 cup flour (I like to do 1 cup white flour, 3/4 cup wheat)
2 tsp baking powder
1/2 tsp salt
1 Tbsp sugar
3-4 Tbsp oil
1 1/2 cup milk

Separate the egg whites from the yolks and beat the whites until they are fluffy with firm peaks. In another bowl mix flour, baking powder, salt, and sugar and mix until well blended. Add milk, oil and egg yolks into the flour mixture and stir until well blended. Fold in egg whites until all is smooth. DON'T OVER MIX.

Pour into waffle iron and cook until the lightness or darkness you like is achieved. Serve hot with syrup or powdered sugar or strawberries and cream or peanut butter or just plain butter. It's delicious any way you do it! Enjoy!

Tuesday, October 28, 2008

Kim's Famous Taco Tuesday Recipe

So I've been thinking long and hard about the perfect recipe to post on this blog. After giving it much thought and many sleepless days I have decided to contribute my secret Taco Tuesday recipe. This recipe is a bit complicated, but for the novice chef such as I, it is the perfect Tuesday meal to end the day. Here it is in all its glory!

Del Taco Tuesday -Three Tacos for 99 cents!!!

Here is what you need to do to prepare this wonderful and delicious meal. If you live in Cambria, just take a right out of the complex onto 1300 W. Take a left at the light onto State Street. Go about 1/2 a mile to a mile (exactness in this recipe is not important) until you reach a sign that says Del Taco. Pull into the drive thru. Order 3 hard or soft tacos for 99 cents. Ask for mild or if you are feeling a bit more on the adventurous side, fiery hot sauce. Pay for the meal and drive home. Voila - a yummy meal of tacos prepared in just mere minutes. For those who need help with this meal because it is a wee bit on the complicated side, I am always happy to offer my services, for just 99 cents.

Please note, this meal can only be prepared on Tuesday!!!

4 Kinds of Brownies!


Caramel-Hazelnut brownies
Makes: 36 bars
Prep: 30 min. Bake: 45 min.

Ingredients
Nonstick cooking spray
3 cups all-purpose flour
1-1/2 cups unsweetened cocoa powder
2 teaspoons baking powder
1 teaspoon salt
2-2/3 cups sugar
1-1/2 cups butter, melted
4 eggs, lightly beaten
2 teaspoons vanilla
1 14-ounce package vanilla caramels, unwrapped
2 tablespoons milk
2 tablespoons hazelnut liqueur (Frangelico)
1 cup hazelnuts (filberts), toasted* and chopped
2 cups dark or bittersweet chocolate pieces
Directions
1. Preheat oven to 350 degrees F. Line a 13x9x2-inch baking pan with a double-layer of foil, extending foil over the edges of the pan. Generously coat foil with nonstick cooking spray; set aside. In a large bowl, whisk together flour, cocoa powder, baking power, and salt; set aside.
2. In a very large bowl, combine sugar and melted butter. Beat with an electric mixer on low speed until well mixed. Add eggs and vanilla; beat until mixed. Add cocoa powder mixture, 1/2 cup at a time, beating well after each addition (dough will be thick). Spread batter evenly in prepared pan.
3. In a large microwave-safe bowl, combine caramels and milk. Microwave on 100 percent power (high) for 1-1/4 to 2 minutes or until melted and smooth, stopping to stir every 30 seconds. Immediately stir in hazelnut liqueur and 1/2 cup of the hazelnuts. Drizzle caramel mixture over top of batter in the pan.
4. Bake in preheated oven for 45 minutes. Remove from oven; sprinkle immediately with chocolate pieces. Let stand for 2 minutes to melt chocolate. Using an offset spatula, spread melted chocolate over top of brownies. Sprinkle with the remaining 1/2 cup hazelnuts.
5. Cool in pan on wire rack. If necessary, chill for 15 minutes to set chocolate. Using the edges of the foil, lift the uncut brownies out of the pan. Cut into bars. Makes 36 bars.
6. *Test Kitchen Tip: To toast hazelnuts (filberts), preheat oven to 350 degrees F. Spread nuts in a single layer in a shallow baking pan. Bake in preheated oven about 10 minutes or until toasted, stirring once. Place the warm nuts on a clean kitchen towel. Rub the nuts with the towel to remove the loose skins.
7. To Store: Place bars in a single layer in an airtight container; cover. Store in the refrigerator for up to 3 days.


Cream Cheese Marbled Brownies
Makes: 42 brownies
Prep: 30 minutes Bake: 40 minutes

Ingredients
Nonstick spray for baking
1 3-ounce package cream cheese, softened
2 tablespoons butter, softened
1/4 cup sugar
1 egg
1 tablespoon all-purpose flour
1-1/4 cups all-purpose flour
3/4 teaspoon baking powder
1/2 teaspoon salt
6 ounces unsweetened chocolate, chopped
3/4 cup butter, cut into small pieces
2-1/4 cups sugar
4 eggs
1/4 cup milk
1 tablespoon vanilla
1 teaspoon almond extract
1 cup chopped pecans
Directions
1. Preheat oven to 325 degrees F. Line a 13x9x2-inch baking pan with heavy foil, extending foil 2 inches over edges of pan. Lightly coat foil with nonstick spray for baking; set aside.
2. In a small bowl, combine cream cheese and the 2 tablespoons butter. Beat with an electric mixer on medium-high speed until mixture is fluffy. Gradually add the 1/4 cup sugar, beating until light. Beat in the 1 egg and the 1 tablespoon flour just until combined. Set aside.
3. In a small bowl, combine the 1 1/4 cups flour, the baking powder, and salt. Set aside.
4. In a medium saucepan, combine chocolate and the 3/4 cup butter. Cook and stir over low heat just until melted. Transfer to a large bowl. Gradually add the 2 1/4 cups sugar, beating on low speed until combined. Add the 4 eggs one at a time, beating after each addition. Beat in milk, vanilla, and almond extract. Gradually beat in flour mixture.
5. Spread the chocolate batter in the prepared baking pan. Spoon cream cheese mixture in mounds on top of chocolate batter. Using a table knife or narrow metal spatula, gently swirl the cream cheese mixture into the chocolate batter to marble. Sprinkle with pecans.
6. Bake for 40 to 45 minutes or until a toothpick inserted in the center comes out with moist crumbs attached. Cool in pan on a wire rack. Use the foil to lift uncut brownies out of pan. Cut into brownies. Store, tightly covered, in the refrigerator for up to 3 days. Makes 42 servings.


Cheesecake Brownies
Prep: 40 min. Bake: 10 min. + 30 min.

Ingredients
1 cup quick-cooking rolled oats
1/2 cup all-purpose flour
1/2 cup packed brown sugar
1/4 teaspoon baking soda
1/4 teaspoon salt
6 tablespoons butter, melted
1 3-ounce package cream cheese, softened
1 egg yolk
1 cup granulated sugar
10 miniature chocolate-coated caramel-topped nougat bars with peanuts, chopped
1/4 cup butter, melted
1 ounce unsweetened chocolate, melted and cooled
1/2 teaspoon vanilla
1 egg
2/3 cup all-purpose flour
1/4 teaspoon baking powder
1/4 teaspoon salt
1/4 cup milk
1 cup purchased chocolate fudge frosting
Directions
1. Preheat oven to 325 degrees F. Grease the bottom of a 2-quart rectangular baking dish; set aside. In a medium bowl, combine oats, the 1/2 cup flour, the brown sugar, baking soda, and 1/4 teaspoon salt. Stir in the 6 tablespoons melted butter. Pat into prepared baking dish. Bake for 10 minutes.
2. Meanwhile, for cheesecake layer: In a small bowl, stir together cream cheese, egg yolk, and 1/4 cup of the granulated sugar; spoon in small dollops over the partially baked layer. Sprinkle with chopped nougat bars.
3. In a large bowl, combine the remaining 3/4 cup granulated sugar, the 1/4 cup melted butter, melted chocolate, and vanilla. Beat in egg. In a small bowl, stir together the 2/3 cup flour, the baking powder, and 1/4 teaspoon salt. Alternately add flour mixture and milk to chocolate mixture, beating with a wooden spoon after each addition just until combined. Carefully spoon over cheesecake layer. Bake for 30 to 35 minutes or until top springs back when lightly touched.
4. Cool in pan on a wire rack. Spread with chocolate fudge frosting. Cut into bars.
Makes: 32 bars


TriLevel Brownies
Prep: 15 min. Bake: 35 min.

Ingredients
1/2 cup all-purpose flour
1 cup quick-cooking rolled oats
1/2 cup packed brown sugar
1/4 teaspoon baking soda
1/2 cup butter, melted
1 egg
3/4 cup granulated sugar
2/3 cup all-purpose flour
1/4 cup milk
1/4 cup butter, melted
1 ounce unsweetened chocolate, melted and cooled
1 teaspoon vanilla
1/4 teaspoon baking powder
1/2 cup chopped walnuts
1 ounce unsweetened chocolate
2 tablespoons butter
1-1/2 cups sifted powdered sugar
1/2 teaspoon vanilla
Walnut halves (optional)
Directions
1. For bottom layer, stir together oats, the 1/2 cup flour, the brown sugar, and baking soda. Stir in the 1/2 cup melted butter. Pat mixture into the bottom of an ungreased 11x7x1-1/2-inch baking pan. Bake in a 350 degree F. oven for 10 minutes.
2. Meanwhile, for middle layer, stir together egg, granulated sugar, the 2/3 cup flour, the milk, the 1/4 cup melted butter, 1 ounce melted chocolate, the 1 teaspoon vanilla, and the baking powder until smooth. Fold in chopped walnuts. Spread batter over baked layer in pan. Bake about 25 minutes more or until a wooden toothpick inserted in center comes out clean. Set on a wire rack while preparing top layer.
3. For top layer, in a medium saucepan heat and stir 1 ounce chocolate and the 2 tablespoons butter until melted. Stir in the powdered sugar and the 1/2 teaspoon vanilla. Stir in enough hot water (1 to 2 tablespoons) to make a mixture that is almost pourable. Spread over brownies. If desired, garnish with walnut halves. Cool completely on wire rack. Cut into bars. Makes 32 brownies.
Make-Ahead Tip: Prepare and bake brownies as directed. Frost and cool. Cover and store at room temperature for up to 1 day.

(bhg.com)


Sunday, October 26, 2008

Classic Potato Salad


We just tried this for the first time tonight and we LOVED it.


Directions

  1. Boil peeled potatoes in salted water till done. Cool to room temperature.
  2. Place diced potatoes in lg bowl.
  3. Mix next 7 ingredients in another bowl.
  4. Add to potatoes.
  5. Add celery and onions and mix well.
  6. Stir in eggs.
  7. Sprinkle a little paprika on top.
*We left out the celery, onion and paprika because we didn't have it and it was still delicious. Enjoy!

Wednesday, October 15, 2008

Quick Chicken Cacciatore

1 package (10.5 ounces) frozen fat-free breaded chicken breast patties, partially thawed
1 medium green bell pepper, cut into strips
4 ounces mushrooms, sliced (about 1 cup)
1 small onion, sliced into wedges (about 3/4 cup)
8 ounces uncooked linguine
1 can (14 1/2 ounces) Italian-seasoned diced tomatoes, undrained
1 garlic clove, pressed
Fresh grated Parmesan cheese (0ptional)

To partially thaw chicken patties, microwave on HIGH 1 minute only. Cut chicken patties into 3/4-inch strips (or cut them into cubes).
Cook linguine according to package directions in 4-qt casserole. Drain and keep warm.
Meanwhile, heat large skillet over medium-high heat until hot. Add some olive oil, and add chicken patty strips (cubes), cook for 3 minutes, turning frequently.
Add bell pepper, mushrooms, onion and garlic, cook for 2-4 minutes (until vegetables are tender but not mushy). Add tomatoes, bring to a boil, and cook for 2 minutes.
Serve over hot linguine. Sprinkle with Parmesan Cheese, if desired.

I love this recipe, it takes less than 30 minutes to make and it looks like a gourmet meal!

Tuesday, October 14, 2008

Steak and Veggie Soup

1.5 pounds steak*
1/2 onion, diced
1 28 oz. can petite diced tomato's
6 cups beef broth (6 cups water + 6 bullion cubes, or 3 cans beef broth)
3 carrots, peeled and sliced
2 ribs celery, diced
1 large potato, peeled and cut into 1/2" cubes
1/4 head green cabbage, chopped very small
1 cup frozen corn
1/3 cup barley
salt, pepper and garlic powder to taste

Brown the beef in a little olive oil with the onion, salt and pepper. Add the remaining ingredients and simmer on medium for 45 minutes until the veggies are tender. The beef stock has a lot of salt in it, so I usually don't need to add any except what I put on the meat as I am browning it.
*You can also use ground beef for this soup
**If you are planning on freezing any leftovers, leave out the potato. It doesn't freeze well.

Monday, October 13, 2008

Chili


We've all had chili before, and some of us have had CHILI! This is CHILI!!!

2lbs. ground beef
29oz can tomato sauce (with liquid)
29oz can kidney beans (with liquid)
29oz can pinto beans (with liquid)
1 c diced onion
1/2c diced green chili
1/4c diced celery (I usually don't add this)
3 medium tomatoes, chopped
2 tsp cumin powder
3 TBSP chili powder
1 1/2tsp black pepper (We like pepper so I always add more)
2tsp salt
2c water

1. Brown the beef, drain off the fat.
2. In a large pot combine all the ingredients and bring to a simmer over low heat.
3. Cook, stirring every 15min or so, for 2-3 hrs.
(Also works great in a crock pot)

Apple Galette

A Galette (gah-leht) is a french dish that is much like a tart, only free formed. I made one last night with some of my FRESHLY PICKED APPLES and it seemed to be a total hit amongst my friends. It was fairly easy, fairly quick, and, as my brother would say, it was REDICULICIOUS.

Crust:
1 1/4 cup flour
1/2 tsp salt
1/2 cup chilled butter
2 Tbsp ice water

Filling:
Between 5-8 peeled, cored, sliced apples
1/4 cup sugar
1 Tbsp cinnamon
1 Tbsp flour

Topper:
1 egg yolk
1 Tbsp butter
1 tsp cinnamon/sugar mixture

Mix together flour and salt thoroughly and then cut in butter one tablespoon at a time until the flour/butter mixture looks like there are pea sized chunks throughout (using a KitchenAid or food processor is easiest but you can easily use a nice strong fork to cut in the butter). Then add the ice water a few teaspoons at a time until you have a nice, smooth dough.

Roll out the dough into a round shape on a floured surface.

After your apples are peeled, cored, and sliced into apple-pie-style pieces, throw them in a bowl with the sugar, cinnamon, and flour and mix by hand until all the apple pieces are covered. Pour your apples onto the center of your pastry dough and fold outer edges toward the center.

Brush egg yolk over the folded edges, pour 1 Tbsp butter over apples peaking out of the center, and lightly sprinkle cinnamon and sugar over the top of it all.

Bake on a greased cookie sheet at 400 degrees for 35-45 minutes or until the crush has browned and the apples are bubbly. It's delicious! Eat warm with a dolop of ice cream! Enjoy!

Thursday, October 9, 2008

Chicken Enchilada Casserole

So tonight, since I didn't have to work, I decided to cook dinner finally! And because it could be a while before my next meal, I thought I'd make my first contribution to this wonderful blog. This is my mom's recipe, and it's so quick and easy. My parents grew up in New Mexico, and my hubby served his mission there, so they all have a serious love for green chile. This was one of my favorite meals growing up as I have learned to appreciate a little spice too. Let's just say I wowed the hubby. (Poor guy- he's impressed with anything home cooked lately). Enjoy!
3 Chicken Breasts
Corn Tortillas
1 Small Onion, Diced
1 Tablespoon Butter
1 Can Cream of Chicken Soup
1 Can Cream of Mushroon Soup
1 Can Chicken Broth
1 Large Can Green Chile (or more)
A Load of Shredded Cheddar Cheese
Boil chicken breasts. Tear or cut up tortillas. Saute onions in butter. Add soups, broth, green chile, and salt and pepper to taste, stir on medium heat til combined. Shred chicken and add to the mix. Spread enough tortilla pieces to cover bottom of 8x12 dish. Add chicken mix and some cheese. Repeat til it's all used up. Load the cheese on top and bake at 350 for about 35-45 minutes until it's hot and bubbly and cheese is a little crispy.

Monday, October 6, 2008

Pleasant & Plump Pumpkin Contest


Hello Lady Chefs!
Our first Cook/Bake off is Monday, November 3rd at 6:30 pm at the clubhouse!
Bring your favorite pumpkin recipe ready to serve and bring your husband/lover/partner to be part of our judge panel!
Winners of the contest take home a free date night including dinner, movie, and babysitter (if needs be) along with the BEST PUMPKIN DISH TROPHY.
Leave a comment here as your entry form including what your dish will be.

Rules:
*You must be a "Contributing Chef" to participate, so if you want to contribute, leave your email address and we'll invite you in!
*It can be ANY dish--breakfast, lunch, appetizer, dinner, dessert, sauce, seeds, drink, whatever. BE CREATIVE! BRING ANYTHING THAT HAS PUMPKIN IN IT!!!
*You must submit an entry form (leaving a comment here saying you'll be there on Nov. 1st

*You must like the recipe you submit

Thursday, October 2, 2008

Mushroom-Tomato Bisque

This tomato soup was served at the most movie-esque and gorgeous wedding receptions I have ever been to...and I've been craving it ever since. Luckily, the chef gave me the recipe and I just can't keep it from the world. Delicious!

1 cup sliced leeks or chopped onion
1 cup sliced celery
4 cloves minced garlic
3 Tbsp butter
3 cups sliced fresh shiitake or other mushrooms*
2-16 oz cans tomatoes, undrained and cut up
3 cups chicken broth or vegetable broth
1/2 cup whipping cream**
2 Tbsp snipped fresh dill or 2 tsp dried dill weed
1/8 tsp pepper
1 more cup sliced fresh shiitake or other mushrooms
2 Tbsp butter
Fresh dill (optional)

Place leeks/onion, celery, garlic, and 3 Tbsp butter in a large saucepan and cook until tender. Add the 3 cups mushrooms and cook until they are tender, too.

Stir in tomatoes, broth, whipping cream, dill, and pepper. Bring to a boil, reduce heat, and simmer covered for about 30 minutes. Cool mixture slightly.

Place 1/4 of the tomato mixture in a blender and blend until smooth. Repeat with the remaining tomato mixture 1/4 at a time and then return it all to saucepan and heat thoroughly.

Meanwhile, put the 1 extra cup of mushrooms in a small skillet with 2 Tbsp butter and cook until tender. Serve tomato bisque with sauteed mushrooms on top as a garnish with a bit of dill.

* For those who don't love mushrooms, this soup does NOT taste mushroomy. The mushrooms just add a denser flavor.

**I use skim milk and it still tastes the same.

Wednesday, October 1, 2008

Mississippi Mud Brownies


These get get all the great eatery sound when I serve them.

Brownies-
6 ounces unsweetened chocolate
16 tablespoons unsalted butter
1 1/2 cups flour
1/3 cup cocoa powder
1/2 teas. salt
3 cups sugar
5 large eggs
3/4 cup chopped pecan or chocolat chips

Topping-
3/4 cup marshmallow creme
1/4 cup semisweet chocolate chips
2 teaspoons vegetable oil

1. Adjust oven rack to middle and heat over to 325. Line 13x9 inch baking pan with foil, allowing excess to overhang edges. Spray foil with cooking spray.
2. Melt chocolate and butter together in microwave; cool slightly. Combing cocoa, flour, and salt in bowl. Whisk sugar and eggs in separtae bowl, then whisk in chocolate mixture. Stir flour mixture into chocolate mixture until no streaks of flour remain. Fold in pecans or chocolate chips and scrape batter evenly into prepared pan. Bake until toothpick comes out with a few attached wet crumbs. Recipe say about 35 minutes, but mine took 45-50. Transfer to wire rack.
3. For the topping: Spoon marshmallow creme over hot brownies and let sit until softened, bout 1 minute. Meanwhile microwave chocolate chips and oil in bowl until smooth. Following photo spread marshmallow creme evenly over brownies and then drizzle with chocolate. Cool brownies at least 2 hours. Using over foil overhang, lift brownies from pan and cut and serve.